![]()
Suzuki 1500LC/C90 Forum F.A.Q.
Mamba Forum member since 12/01
Many Thanks To Mamba for creating this FAQ!

Now Maintained by Crow and Fritz

Click this link to download a (2.5MB) ZIPped RTF document with complete instructions and pictures created by former Forum member Dave Fischman.
What stereo/speaker system options are available?
Other than roll'n your own, here's a few retail options:
See the Mod Shop section at Mocc's Place
Add a Stebel Nautilus compact airhorn, 139db of ear-shattering attention! I mounted one of these babies by the left-side floorboard; sits partially on the crashbar in my case. You may need to fab a slightly different bracket setup but the horn fits nice there, with the trumpet section facing front and since I bought the chromed one it doesn't look too shabby. I kept my existing horn (a small FIAMM with an HD "cowbell" cover) on the stock horn mount just for looks. Click here to download the "how to" .RTF document I created, complete with large pictures (ZIP'd file size is about 7MB).
Similar but different mounting method instructions in PDF format here, Courtesy of Forum member "jrunger".
Pair Valve info, removal & replacement
See the Mod Shop section at Mocc's Place
To purchase a LC mounting bracket kit, look for "aircleaner bracket" on Ramster's http://motorcycle-motorcycle.com site.
Courtesy of Forum member "VS1600"
The long awaited brackets for the C90 are now ready. These are for mounting
Hyperchargers or other A/C covers.
See
this Forum post.
How can I cleanup that naked jug look after removing the Pair Valve?
Courtesy of Forum member "DocC90T"
See
this Forum discussion.
See this link over at Mocc's Place
See the Mod Shop section at Mocc's Place
See the Mod Shop section at Mocc's Place
For my own installation, I used
EasyBrackets along
with home-made straps
similar to those shown in the link off Mocc's site above. I bolted the straps to
the EB's, and to the back and bottom sides of the bags. I also crafted an
L-bracket for the rear which mounts to the side of the bag and the bottom
bolt on the license tag holder. This helps a lot with stabilizing the bags as
otherwise they tend to "flop" a bit on bumps. You can use wingnuts to
retain the quick-release aspect. Just paint the straps to match so they don't
rust. To prevent the holes in the fiberglass bags from cracking I used rubber
grommets and washers at all the mount points.
Click here to download a .PDF file showing one way to mount Suzuki Cavalcade bags with frames
See the Mod Shop section at Mocc's Place
Select or right-click and "Save Target As" this PDF document (640kb)
See this page (includes exploded view of the switch!)
OR, you can pay $ to have the job done professionally....contact Dale (VS1600) on the Forum
See the Mod Shop section at Mocc's Place
See this post on the Forum by oilcan1500lc or download the same information as a Word RTF document
Here are install instructions for the Kisan SM-3 Signal Minder:
Courtesy of Forum member "OneFromOz"
"The pics are just ok as I had to get close so it's a tad out of focus.
Here's the pics:
http://photobucket.com/albums/v602/onefromoz/Kisan/
Here's what to do:
* Remove oil filler cover.
* Remove the 10mm bolt holding the fuse assembly in place.
* Pull the fuse assembly out and turn it upside down so you can work on it.
* You need to cut the Light Blue wire (each end is circled in the pic) and connect the
Black wire from the Kisan to the end that come down from the wiring loom. Don't
re-connect the part of the Light Blue wire (the lower circle in the pic).
* Tap the Orange wire (has a square around it in the pic) and connect the Red
Kisan wire to it. This was the one I had the quick connect on.
* For the Brake light connection to prevent it turning off the signals (see pic
where the red wire goes into the loom at the bottom), I cut a small horizontal
slot in the loom to access the wires and connected to the White with Black
trace. You can tap into easier by removing the side cover and the loom has a
connector there.
* I used an existing zip tie to secure the Kisan unit next to the Fuse Assembly
and used the 10mm bolt to provide the Ground for the Green Wire.
* Once all is back together, test turn signals with and without the Brake
activated. Default cutoff I think is 10 flashes.
* If all working, put oil filler cover back on.
I did not do the wiring mod to add in the hazard flashers. If you want to do
that, there's a loom you can tap into easily at the rear of the gas tank (have
to remove the seat) and you'll see it as it leads under the left side of the
rear fender."
Check with the Forum Vendors for best pricing, or
Google on "Kisan SM-3".
See the Mod Shop section at Mocc's Place
Try a LED retro-kit replacement, see this page
----------------------------
Also see the instructions below:
Courtesy of Forum member "CANUCK"
LC REAR TURN SIGNAL/RUNNING LIGHT MOD
I had thought about changing the visibility of the rear of the LC.
Was wondering why they didn’t make the rear signals the same as the front?
Seems to me the rear should be on as running lights / signal lights.
I had tried to modify my existing rear signals but the lamp socket is molded into the rubber.
Through the help of some generous members (Flowpo & Mailman) I had two front signal lights sent to me. Using the front signals, which have the correct socket for an 1157 bulb and are already wired makes this easy.
THE PROCESS (wired for a 99 LC):
1. Remove the turn signal mount. Disconnect the signals from the mount.
2. With your replacement signals you might have to use the connector plugs from the old signals. Solder the wires from the connector to the wires from the new signals.
See http://canuckspage.homestead.com/files/Schematic.jpg
3. Remove the seat. There you will find a plug down on the right side with five wires running to the back. This is the harness for the taillight and signals.
See http://canuckspage.homestead.com/files/Plug_Location.jpg
4. Unhook the harness from the wire supports from along the inside of the fender.
5. Splice in a wire that is the correct length into the GREY wire coming out of the plug. This is the power for
the running lights.
See http://canuckspage.homestead.com/files/Wire_Location.jpg
6. Pull the new wire through the opening in the fender to where the signals mount.
7. Tie this wire into each one of the remaining wires that you have coming out of the signal housing. (I used spade connectors)
8. Test to see if it is connected correctly and re-assemble wire harness into the wire clips on the inside of the fender
9. Tie wrap the short section of the wire that runs to the signal mount inside the fender to the harness.
Much more visable, yes? See http://canuckspage.homestead.com/files/Running_Lights.jpg
----------------------------
Or you could go this route:
Courtesy of Forum member "byronwarman"
http://www.kuryakyn.com/products.asp?bn=metric&ci=2967
I put ^this on my 03 LC this winter, simple splice in, sends half brightness to the rear turn signals for running lights, full brightness when the brakes are applied, or turn signal is turned on. There are red lenses to fit the LC, Geesh (BFO5150) made some red lenses for his C90, he has a slide show detailing the process, I think. . In Oregon, amber lights on the rear of a moving vehicle are illegal, but a riding partner has them, and has never been stopped. I like the red look, and also have the brake strobe on this unit enabled, gives 5 fast flashes on the brakes, then solid. This unit is affordable, easy to install, and gives lots more light on the rear of the bike.
----------------------------
And here's yet another solution:
Courtesy of Forum member "LTDaveCass"
You can also go with a product like the Kisan SignalMinder to convert your
existing turn signals to running lights. See it here at
Metric Thunder. As to your second question, yes, you must change the lenses
from amber to red for rear running lights. If you search on the forum, you'll
find that many guys have found red lenses at an auto supply store that were
close enough to be modified. (You'll need to drill holes in the face for the
screws.)
Looking online this morning, I came across this
slide show. It's for a different model bike, but I found it interesting
that instead of replacing his lenses, he found some
transparent paint and just recolored the originals.
----------------------------
One more way:
Courtesy of Forum member "OneFromOz"
And there's also this mod that allows you to have red running & brake lights and keep your amber turn signals. It's only for the LC (98-03) as the '04 onward has the bullet style turn signals which are a lot smaller. I fitted one of these recently.
http://www.electricalconnection.com/other-lighting/tsk-star&sport.htm
If the problem with the bulbs failing is due to them cracking, then try reworking the trim ring. It could be putting too much pressure on the lights. Take some tin snips and cut little notches so the wire clips don't hit the trim ring.
H3 35w OEM replacement:
http://www.waltersworkshop.com/bulbs-lighting.html
(scroll down the list to the 35w)
The sealed beam spots are #4416, get them from NAPA, or a tractor supply store.
Those are 30w.
Getting the brighter H3 55w might overload the LC's charging system.
See the Mod Shop section at Mocc's Place
See the Garage section at www.mambaville.com/intruder1500
The Radio Caddy Fairing
Courtesy of Forum member "OneFromOz"
"Jireh Cycles has
them (Part # 13-90) cheap - mine was $353.55 delivered. The Radio Caddy Fairing
by The Trike Shop
(#TRI001K006 ) is the same fairing across several bikes and just the mounts are
different. I ordered the Harley Radio Caddy Faring from Jireh and the 1500 LC
mount kit from the Trike Shop. They are now made from plastic - quality inside &
out is very good and mounting is easy once you know how - mount kit comes with
no instructions."
Click here to download a ZIPped RTF
document showing how to mount the fairing on an Intruder LC.
For you C90 owners, reportedly The Trike Shop is looking at making brackets
for the C-90. Call Doug at The
Trike Shop and see if there's an update. OR, you can adapt the LC brackets
and trim the fairing to fit your C90 using these instructions (in Word format),
courtesy of "Helo1pilot".
And if you find the stock RCF
windshield is too short...
Courtesy of Forum member "JScharbrough"
"I bought a sheet of the acrylic and attempted to bend it myself with a mold I made and some heat, not an easy task to get a smooth sweeping bend. Then I took a second look at JC Whitney. They offer Harley fairing replacement shields in two different styles and several sizes. The 1986-1995 FLH models are an exact fit with the RCF. I installed it in less than 5 minutes. I went with the 16 inch clear and figured if it was too tall I could cut it down. They also offer a 10 inch and a 13 inch and they come clear and tinted.
For size reference you can see the 16 inch in my new sig pic. This shield now sits about right for me. It is about 1-2 inches below my line of sight and there is hardly any wind around my head even at 80 mph. At speeds around 50 I have successfully smoked a cigar so that will give you an indication of how much wind I get in my face.
The cost for the 16 inch shield is $58.99. Here is a link for those that need it.."'
Other fairings
Destination Cycles makes a batwing fairing for the LC, tho' it's a LOT more expensive
WideOpenCustom Fairings makes a fairing with turnkey radio kit optional for the C90, might fit the LC?
See the Mod Shop section at Mocc's Place
Kuryakyn carries these; Part# 8027 is
the Brake Pedal Cover, you just remove the rubber pad, cut the bottom 1/4"
off your stock pedal, drill a hole to match the hole in the Kuryakyn cover, then
bolt it on. Part# 8029 is the pedal used for the heel shifter; pull off the
rubber pad, drill a hole and mount it. You can pick from which size toe shifter
you want; cut off your toe shifter, drill a hole and tap it out to match the
threads on the Kuryakyn, then just bolt the new one on. OR buy Part# 8851, which
will slide over the existing toe shifter shaft; use duct tape, plastic tubing,
or some other "filler" so it will fit tight with the set screw.
Check with the Forum vendors for best pricing
Those round fork reflectors are ugly, where can I get slimmer ones that look better?
Try your local Harley shop, part numbers 59481 & 59482, right and left side
Can I shorten the width of the rear turnsignal bar?
CustomWorld sells an adapter ( FLASHER ARM REDUCER ITEM# 03-0121 ) that replaces the black rubber part and moves them in.
Or some guys have used a chunk of conduit and drilled and tapped that to mount the assemblies.
I like the styling of the stock seat, what can I do to make it more comfortable for long trips?
Check out this tutorial provided by Steve Birkes
Where can I find a trunk for my LC?
Check out Scootworks
You can also find many used & new ones on
eBay from Harleys, Ventures,
Cavalcades, and so on that can be modified to fit. If you have a small flat rear
rack a popular and inexpensive trunk like the one shown below can often be found
on eBay. It bolts easily to the rack and includes running/brake/turn lights.
Only caveat is that it is very lightweight (thin ABS plastic) which is good from
a mounting standpoint but won't take the abuse like a heavier trunk. For the
model shown, made in China and usually listed as "Luxury Motorcycle Trunk"
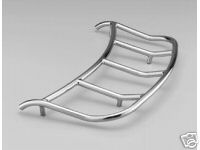
or "VIP trunk", you
can also mount a good looking chrome trunk rack (off a Honda GL 1800, PN
08L42-MCA-100....see pic). Rack fits perfect, requires drilling 4-holes in
the lid, another common eBay item.
Here is a company
that sells the trunks direct.
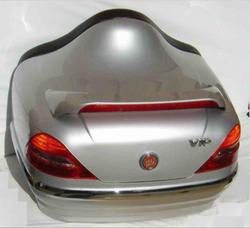
Note that the above trunk does include a wiring diagram. Here is how I did mine.
How do I add more lights to my VIP trunk?
While the above VIP trunk is a great deal for the money, the LED lighting is weak especially in sunlight. Several owners have added extra LED strips to it as a remedy. This can quickly get expensive. If you have basic electronics skills, you can make your own LED strips for about $30 per pair using parts from Radio Shack. Download this ZIPped document for the details (Courtesy of Forum member "FCOMPTON1").
What can I do to improve the lean angle of the kickstand?
Check out Geesh's Slideshow of how to shave some metal off the kickstand stop.